

1. First of all: grab a regular brown paper bag and fold it in half. (Sometimes the bags aren't straight, so the measurements get kind of off, which is one of the reasons I won't give any out. Also, your bag might be bigger than mine - or smaller - to begin with! I used one about the equivalent of a paper lunch bag)
2. Take your main patterned paper and trace the outline of the front. Cut just inside those lines, leaving a small gap. Do the same for the insides. Tear some strips of paper and grab a few matching journaling spots that'll add interest. Chalk all the edges.
3. Stick down the front and the first inside with adhesive, but steer clear of any areas where you'll be sewing or you might end up with a sticky needle on your sewing machine. (Take it from MY experience: that is NOT a good thing...! ;))
Sew straight lines in the back, where you want your tags to sit. This will kind of form a second "compartment" in your bag's opening.
4. Stick down the paper and ribbons and sew around the edges of the two first sides. The backside you need to go about a bit different. You sew the right edge (the one that sits to the side where the opening is) and THEN you stick the papers down and sew around the other three edges. (I chose to do a zig-zag on the side I'm not actually sewing down, so you should easily be able to see which side I mean).
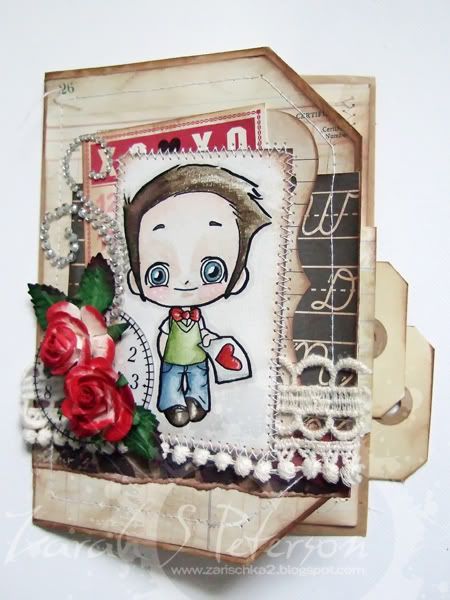
5. Get your valentine's Tobi (or whatever image you've printed and coloured) and stick him down, using adhesive only in the middle. Sew around the edges with zig-zag.
6. Embellish, stick down the text and add the tags in the back. You can also choose to stick a gift certificate in the pocket, or a movie ticket, or a photo or... your own imagination's the limit here! :)
7. You're all done! Hope you're happy with what we made!
Check out the exquisite detail inside!

Are you inspired? Go forth and make! If you follow the fun tutorial here please link it up and show us! I'm sure Zarah would love to see as much as I would all the different ways to you can do this project.
You still have plenty of time to get in on our Scallops Challenge HERE. It pretty hawt so don't miss out!
WOW, this card is amazing!! Love how Zarah created it from a paper bag...AWESOME!! :)
ReplyDeleteWowsers Zarah!!! this looks amazing!! Fabbo tutorial!
ReplyDeleteHugs Leonie
This is fabulous. You would never guess that it was a paper bag.Gorgeous embellies and colouring.
ReplyDeleteLuv CHRISSYxx
Holy moly this is incredible!
ReplyDeleteAbsolutely fabulous!
ReplyDeleteAwesome tutorial Zarah!
ReplyDeleteWozas Gorgeous Zarah!! Love it!
ReplyDeleteSo stinkin' CUTE! LOVE this. Now all I need is the nerve to try sewing on a project. LOL Fab tut! xxD
ReplyDeleteThank you so much, ladies!! *curtseys*
ReplyDelete